What comes first, Model Railroad Benchwork or Trackplan?
Most model railroaders will tell you to design a track plan before starting to build your model railroad benchwork. In general, I agree, because in many cases the track plan determines the type of benchwork required. However, this is not always true, as every situation is different. Once I completed my future hobby room remodel and preparation, I was able to move forward.
Knowing this may be a controversial topic, let me explain the methodology behind my madness. During negotiations for land access and right-of-way planning with my wife, I agreed to certain stipulations. As outlined in my previous article, My Rules for a Successful Model Railroad, this meant working around specific room restrictions while still meeting my self-imposed layout parameters. I had already determined, in broad terms, what I wanted in a model railroad. Because of this, the track plan could remain flexible, while the room restrictions could not. For that reason, I felt it was easier to design the benchwork first and develop the track plan second.
Design Considerations For Future Removal
Before we dive into designing my model railroad benchwork, we need to have a somewhat uncomfortable conversation first. As model railroaders, we all get excited when we are finally able to build our dream layout. We eagerly look forward to the locomotives, rolling stock, structures, and other items we collect to make our layouts a personal expression of who we are.
At this early stage of development, it’s important to think ahead and ask ourselves some significant questions:
- How do I disassemble the layout if I ever want or need to move it to a new location?
- How would my loved ones disassemble and remove the layout in the event of my death?
- What can I do now, in the early stages, to ease this burden for my family and myself?
When I ask myself these questions, the best answer I can come up with is mitigation through design. This means taking some extra time during the design process to incorporate a few simple features now, that will reduce the burden of removing the layout when that time comes. These include:
A Free-Standing, Self-Supporting Design
Ensure the model railroad benchwork is constructed so it does not need to be attached to the walls, ceiling, or other parts of the room or house. This approach causes the least amount of damage to the room and minimizes or eliminates the need for repairs or remodeling after removal. Ideally, this limits the aftermath to simple cleaning and perhaps some touch-up painting, or at most a full room repaint.
A Modular, Sectional Design
The bottom line is to make the layout easy to disassemble with the least amount of destruction to both the layout and the room, regardless of the circumstances. By designing the model railroad benchwork in sections and assembling those sections with nuts and bolts, it should be possible to unbolt and separate them using common household tools.
Electrical Quick Disconnects
All electrical connections, both from the layout to the house and from module to module, should be equipped with quick-disconnect plugs. These plugs should be clearly labeled, simple to use and safe to disconnect by anyone unfamiliar with the layout.
When I take a step back, I realize that in the event of my death, my family would likely have no idea where to start. For this reason, at some point down the road I’ll create a Layout Disassembly & Removal Guide for them. As I assemble the layout, I’ll take lots of photos and detailed notes to use for a guide. By simply reversing the build process should make for an easy to understand and detailed guide.
Establishing these simple mitigation-through-design features now, I can significantly reduce the burden of removing the layout when that time comes.
Using Computer Aided Design (CAD) Software
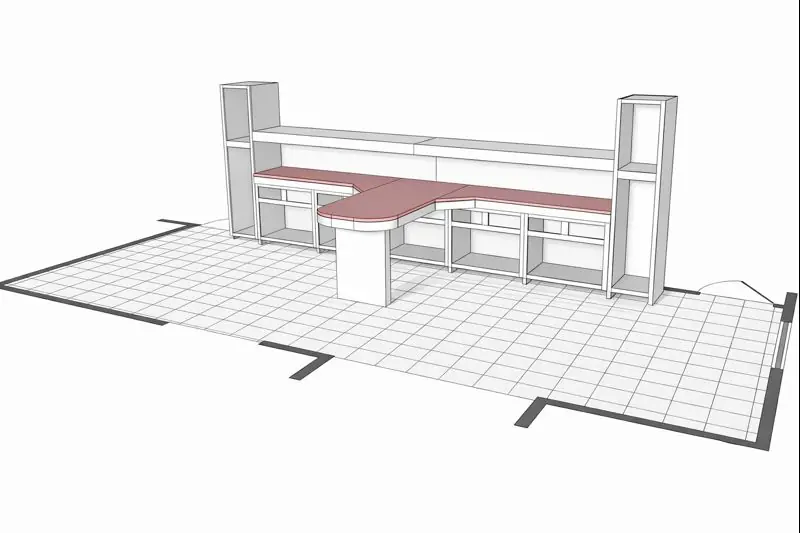
With the room restrictions already defined, I had a clear idea of what the layout might become. Finishing the hobby room also sparked conversations about a future kitchen remodel. Because the two rooms are adjacent and visually connected, I decided to treat them as a cohesive space. That connection influenced my choice to match the model railroad benchwork with the kitchen’s future Shaker-style drawer faces, doors, and face frames. Given my background as a woodworking hobbyist and access to a dedicated shop, this approach felt both natural and practical.
CAD software is an ideal tool for designing model railroad benchwork because it closely mirrors how it is actually built. It allows you to think in real-world lumber dimensions, board by board and joint by joint. I can accurately model components such as L-girders, joists, risers, frames, legs, and braces, making it easy to visualize how everything fits together before cutting any wood. This helps produce strong, efficient benchwork that fits the room well and looks good, while also allowing you to test heights and clearances, generate cut and material lists, and avoid costly mistakes.
I’ve relied on CAD software for many woodworking projects over the years. SketchUp Make was my go-to tool when it was freely available, and I still use my existing installation today. While I’m slowly exploring Fusion 360, for this project I’m sticking with a workflow I know and trust.
Maximize Storage While Effectively Utilizing Space
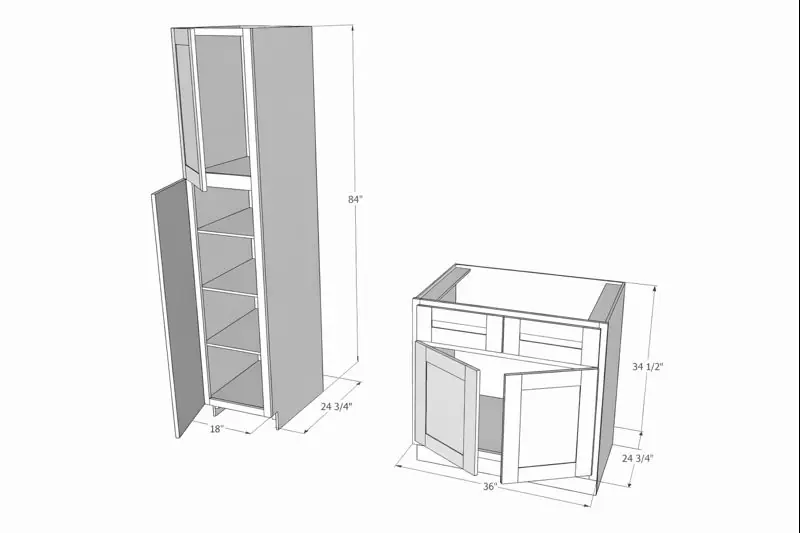
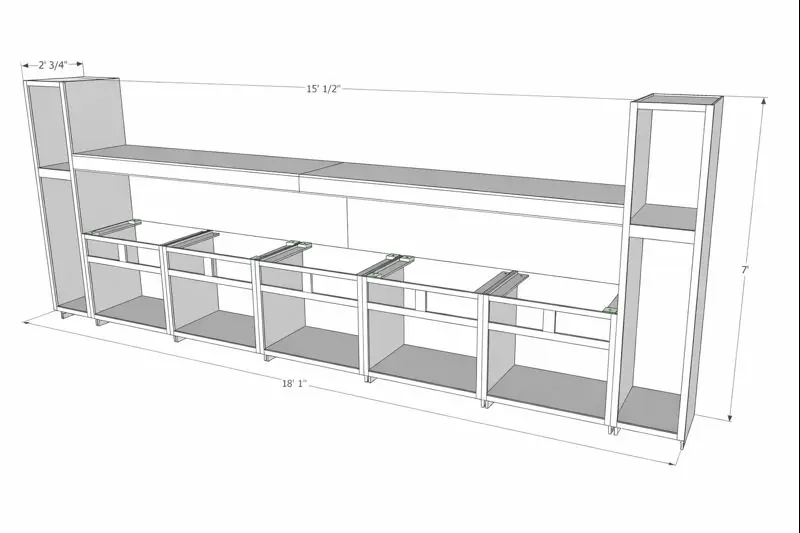
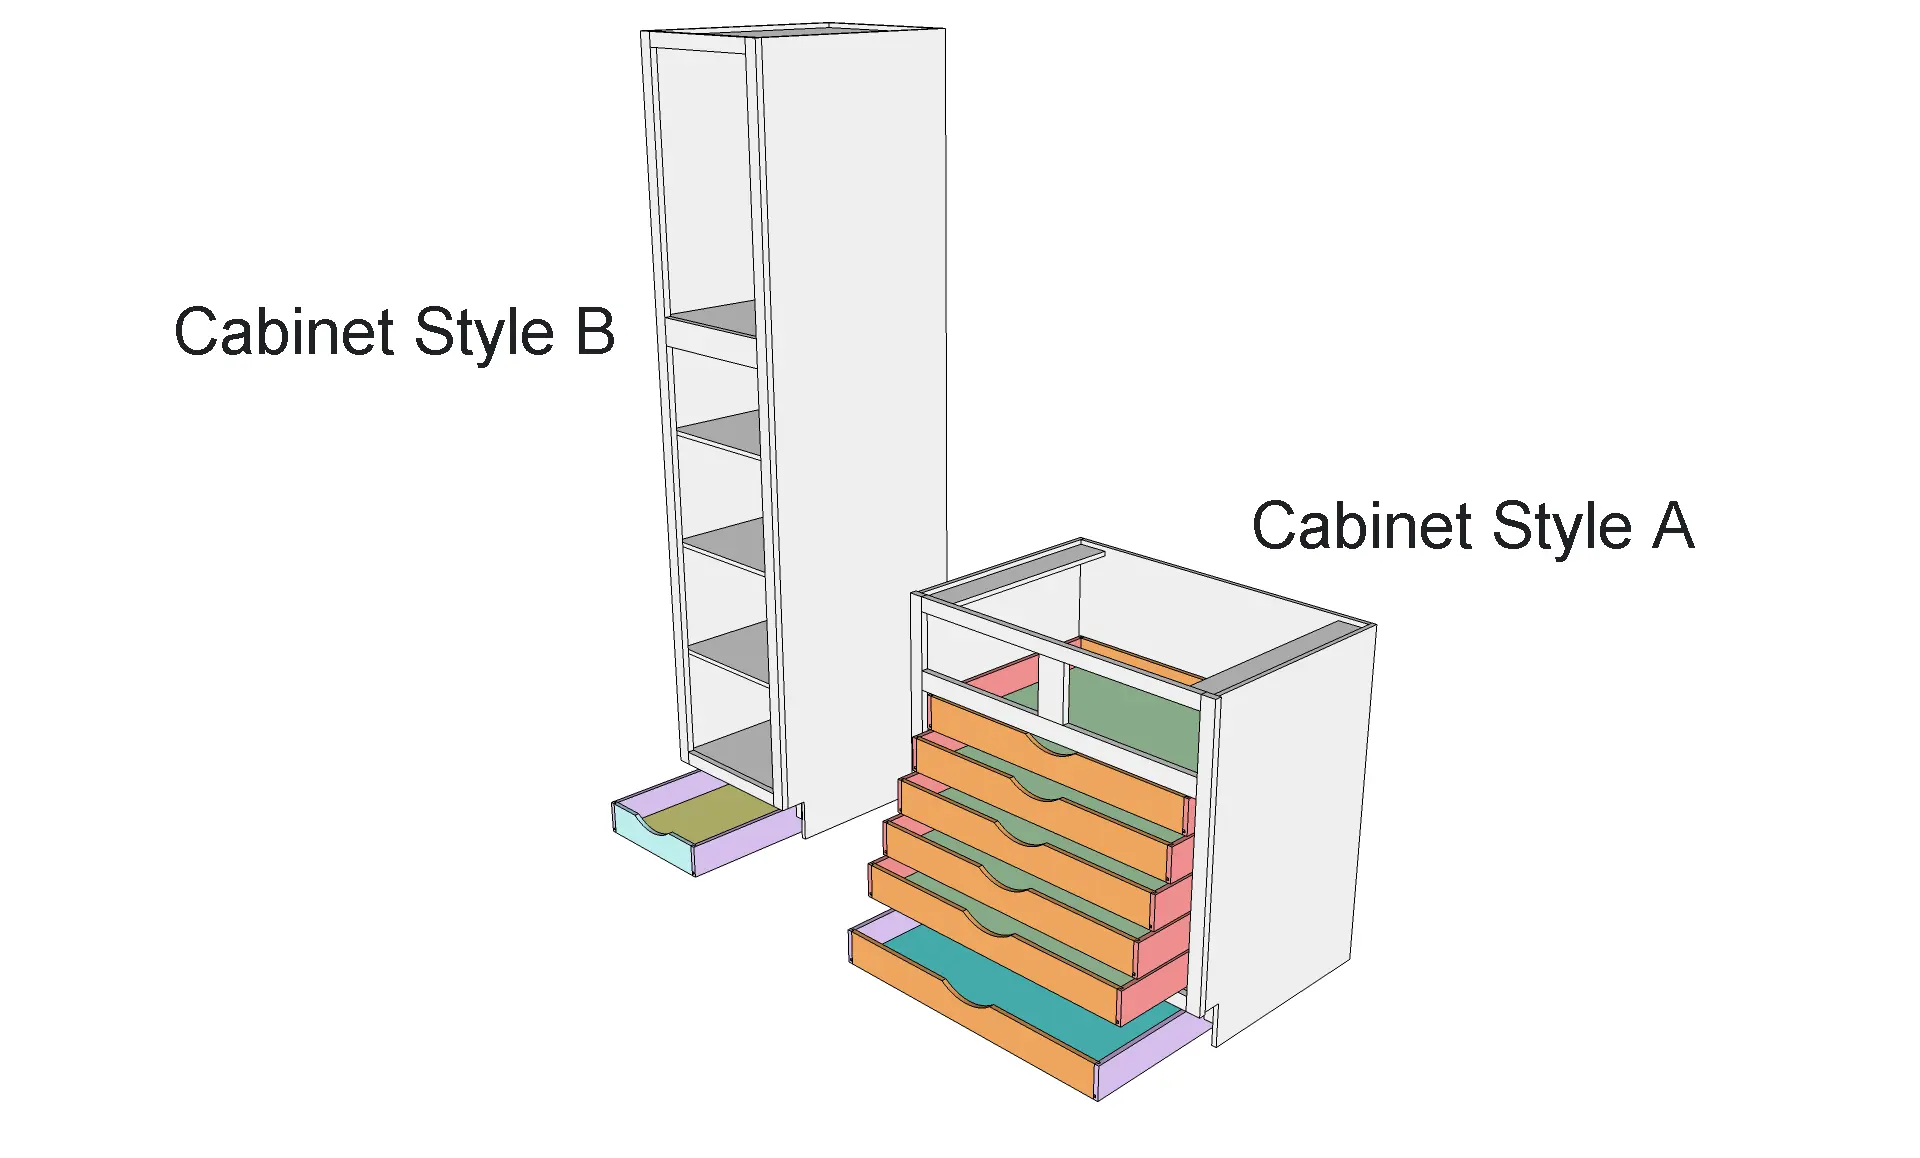
I spent several weeks designing and refining different cabinetry variations. All of the cabinets were designed using industry-standard dimensions. The final design I selected resulted in a total of seven cabinets in two styles: (A) five 36-inch-wide base-style cabinets, and (B) two 18-inch-wide full-height cabinets. Both designs closely resemble typical, everyday kitchen and bath style cabinetry.
The base cabinets feature two side-by-side drawers at the top, two side-by-side doors at mid-level, and one large, full-width drawer concealed within the toe kick. The two end cabinets use a vertically stacked, two-door design and also include a full-width drawer hidden in the toe kick.
Model Railroad Benchwork with Rolling Stock Storage
I believe I’m a typical model railroader. Like many modelers, I have more rolling stock than track available to run all my freight cars and locomotives. Most of us store excess rolling stock in their original boxes until it’s needed on the layout. Over time, as new models are released, our collections tend to grow. As they do, it becomes easy to forget what we already own, which often results in some rolling stock never making it onto the layout at all.
As outlined in my previous article, My Rules for a Successful Model Railroad, I mentioned that my modeling era would be dynamic in nature. Modeling a time period from the 1970’s to the present involves a wide variety of rolling stock and locomotives. This is one of the primary reasons I chose to design my model railroad benchwork with custom storage drawers.
Another reason is my plan to use the Java Model Railroad Interface (JMRI). JMRI will generate car movements on and off the layout, simulating interchange with other railroads. From an operational standpoint, these drawers function as staging. Using drawers instead of boxes will make rolling stock much easier to manage while maintaining a neat and organized appearance in the room.
Determining Drawer Size
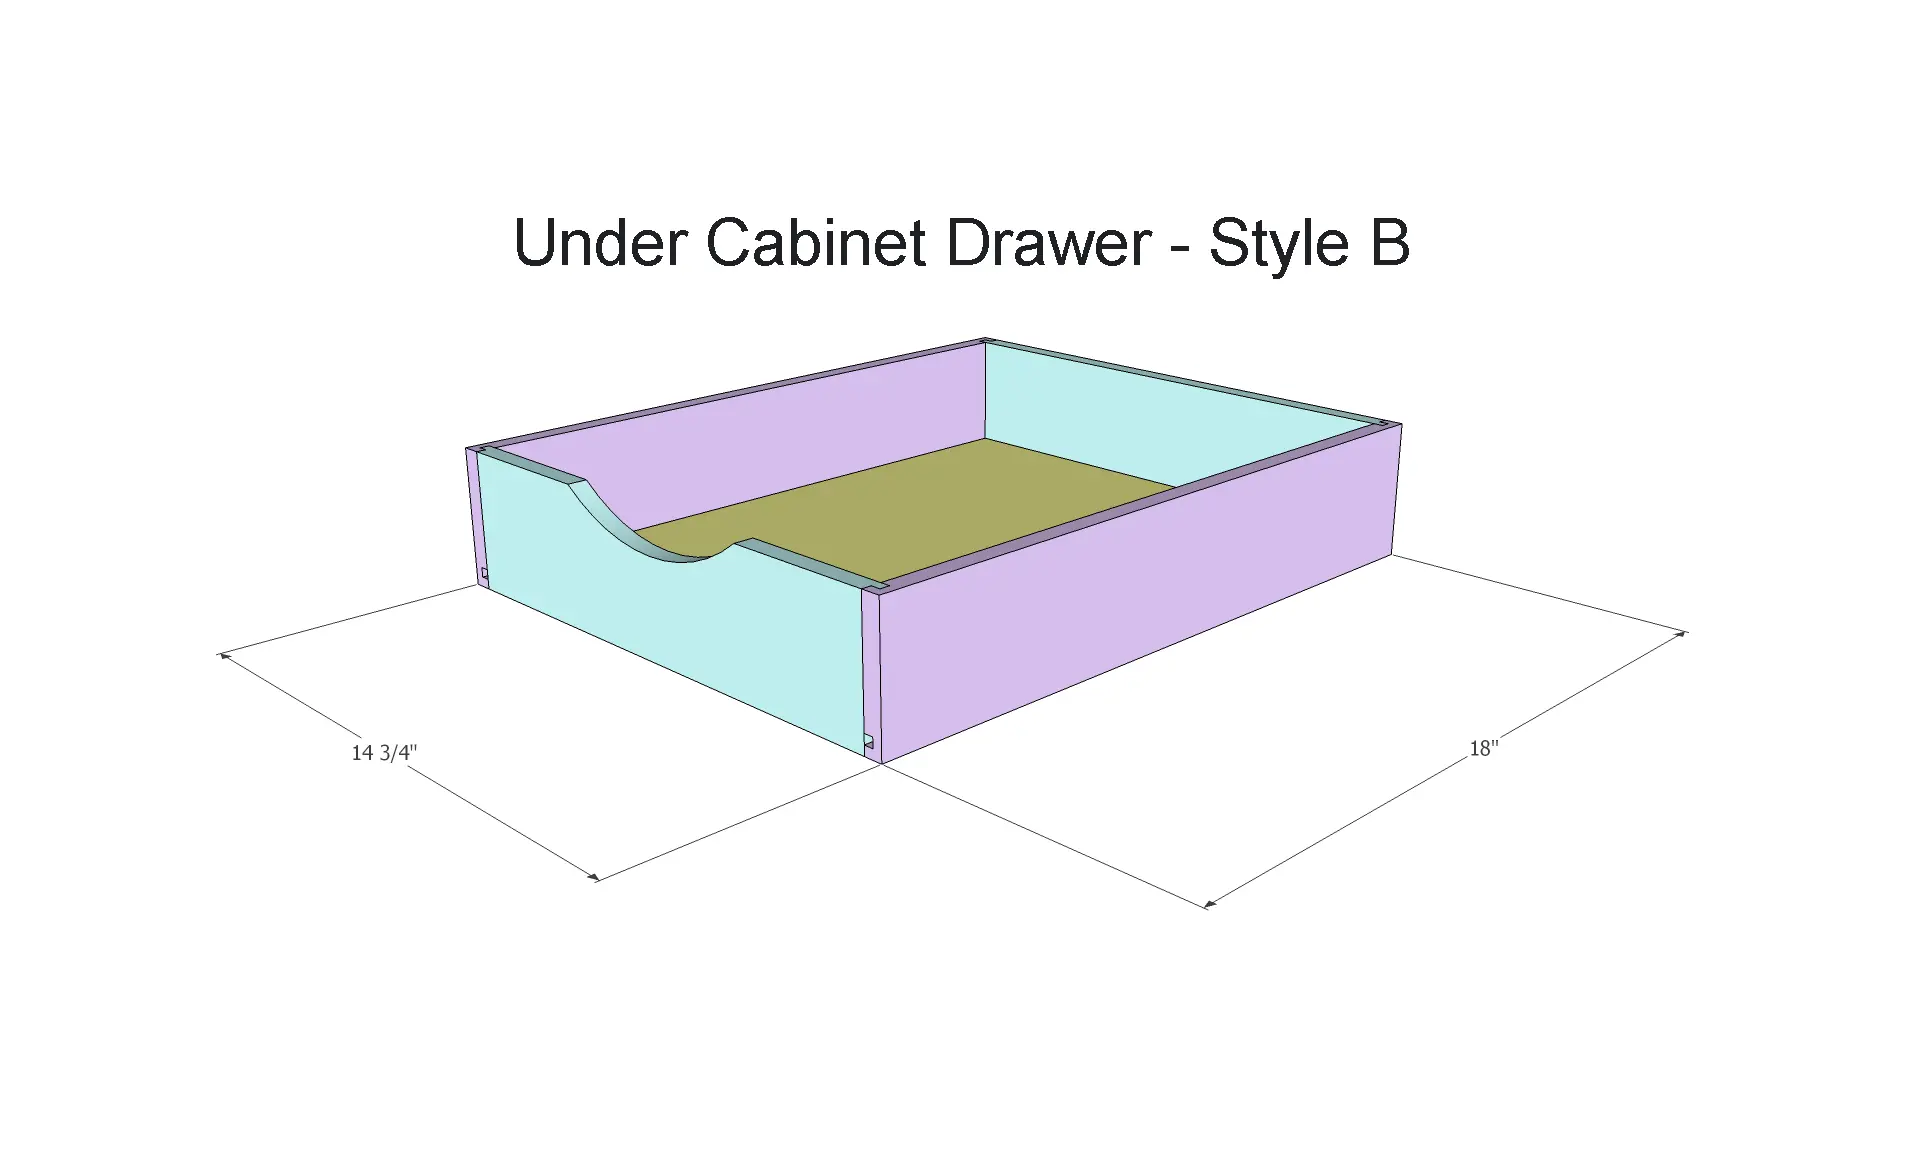
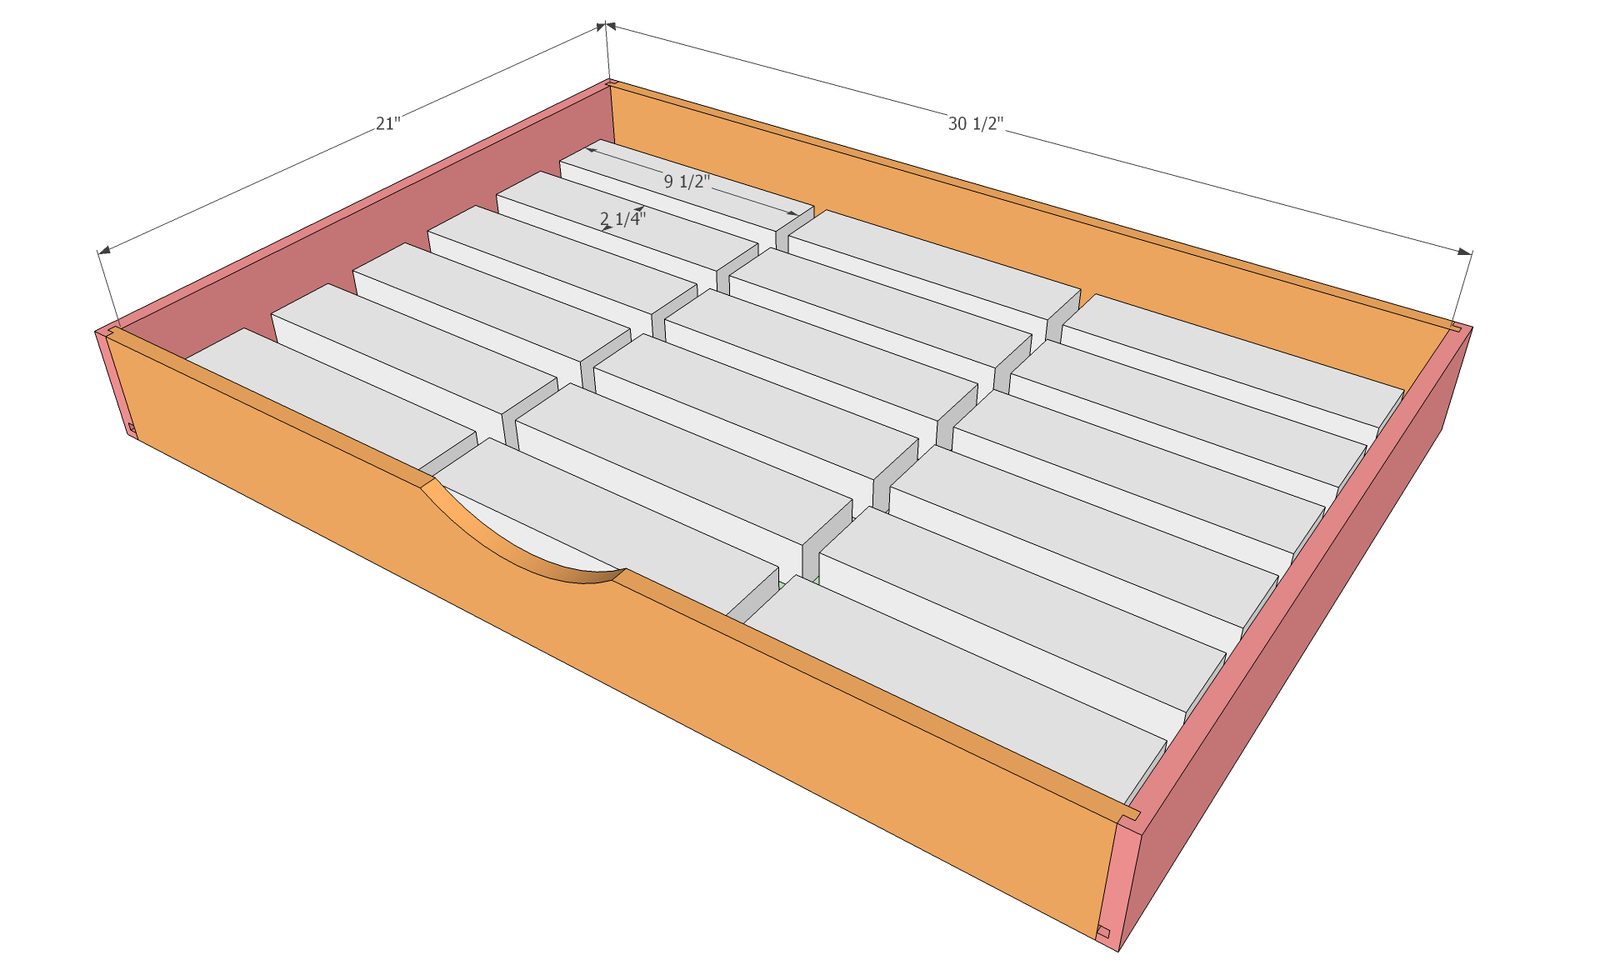
Before determining how many drawers could fit into the cabinets, I first needed to establish the drawer size. Common sense tells us that the width and depth are fixed by the internal dimensions of the cabinet carcass, minus the space required for the drawer slides. This results in exterior drawer dimensions of approximately 31-3/8 inches wide and 22 inches deep.
Next, I needed to determine how much rolling stock could fit within that space. The planned layout is an HO scale shoreline set in a time period from the 1970’s to the present day. Freight cars from that era average 50–60 scale feet in length, with first- and second-generation four-axle locomotives being roughly the same size. This means the average piece of HO scale rolling stock occupies approximately 9-1/2 inches in length, 2-1/2 inches in height, and 1-1/2 inches in width.
Since the available internal height is also fixed and only minimal vertical clearance is required, the drawers need to be at least 2-1/2 inches tall. While this height would function, it would not make effective use of the available space. For that reason, I increased the drawer height to 3 inches, which better fills the space while providing a more balanced and visually pleasing appearance.
Determining Drawer Quantities
Now that I’ve established the required sizing, it’s time to determine how many drawers I’ll need to build in total. To do that, let’s walk through the numbers.
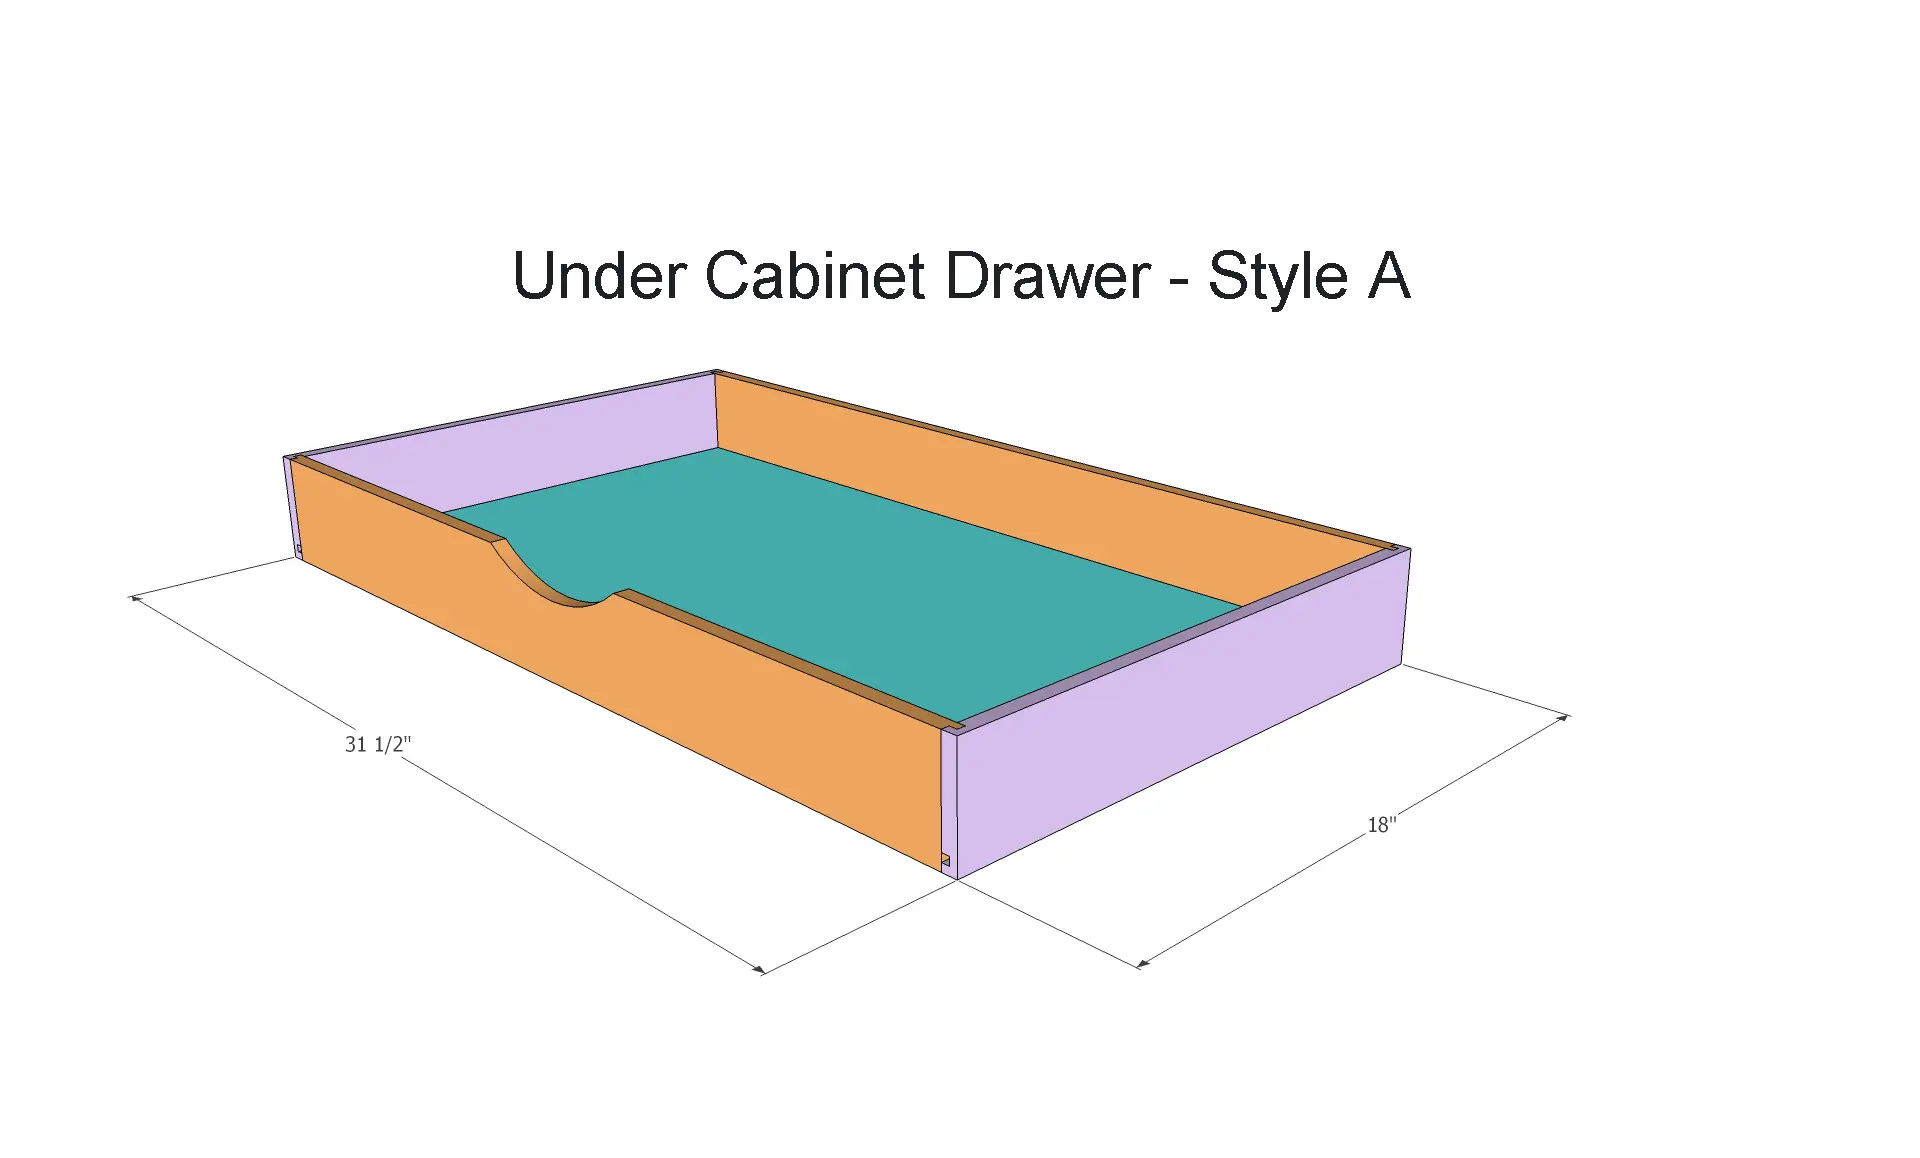
There are five Style A cabinets. Each of these cabinets is designed to accept six drawers: five drawers located in the mid-section of the cabinet, and one additional drawer that is slightly shallower in depth and mounted under the cabinet, concealed behind the toe kick. I also have two Style B cabinets. These can accommodate only the under-cabinet drawer, which is also hidden behind the toe kick. The under-cabinet drawers are considered to be bonus storage and I anticipate they will be used for higher-value items. Items that benefit from being concealed from a casual or opportunistic theft perspective due to their inconspicuous design and hidden placement.
When everything is added together, the final count comes to a total of thirty-two drawers in three different sizes. This layout provides a substantial amount of storage while making efficient use of every available inch of cabinet space. Based on my calculations, using 60-foot freight cars as the average length, the twenty-five mid-section drawers have the potential to hold approximately 18 pieces of rolling stock each, for a total capacity of about 450 freight cars and locomotives. That’s a lot of rolling stock for what is essentially a 15-foot shelf layout. I think I may have an addiction…
Small Parts Storage Solution
My passion for model railroading began in the early 80’s. At that time, I modeled the majority of my rolling stock projects using Athearn’s Blue Box product line, and I continued to do so for several years. In 2009 I learned that Athearn discontinues Blue Box model kits, I began buying them in bulk. I stalked hobby shops, train shows, and eBay auctions for as long as I could financially afford to. Much of the new old stock I was able to acquire consisted primarily of undecorated kits.
Realizing my success with eBay and the abundance of bulk product auctions, I was also able to purchase hundreds of detail parts and scratch-building supplies. Most of these came from hobby shops that were going out of business or had already closed. Whether or not this was a direct result of Athearn’s decision, I’m unsure but some in the hobby would say it was.
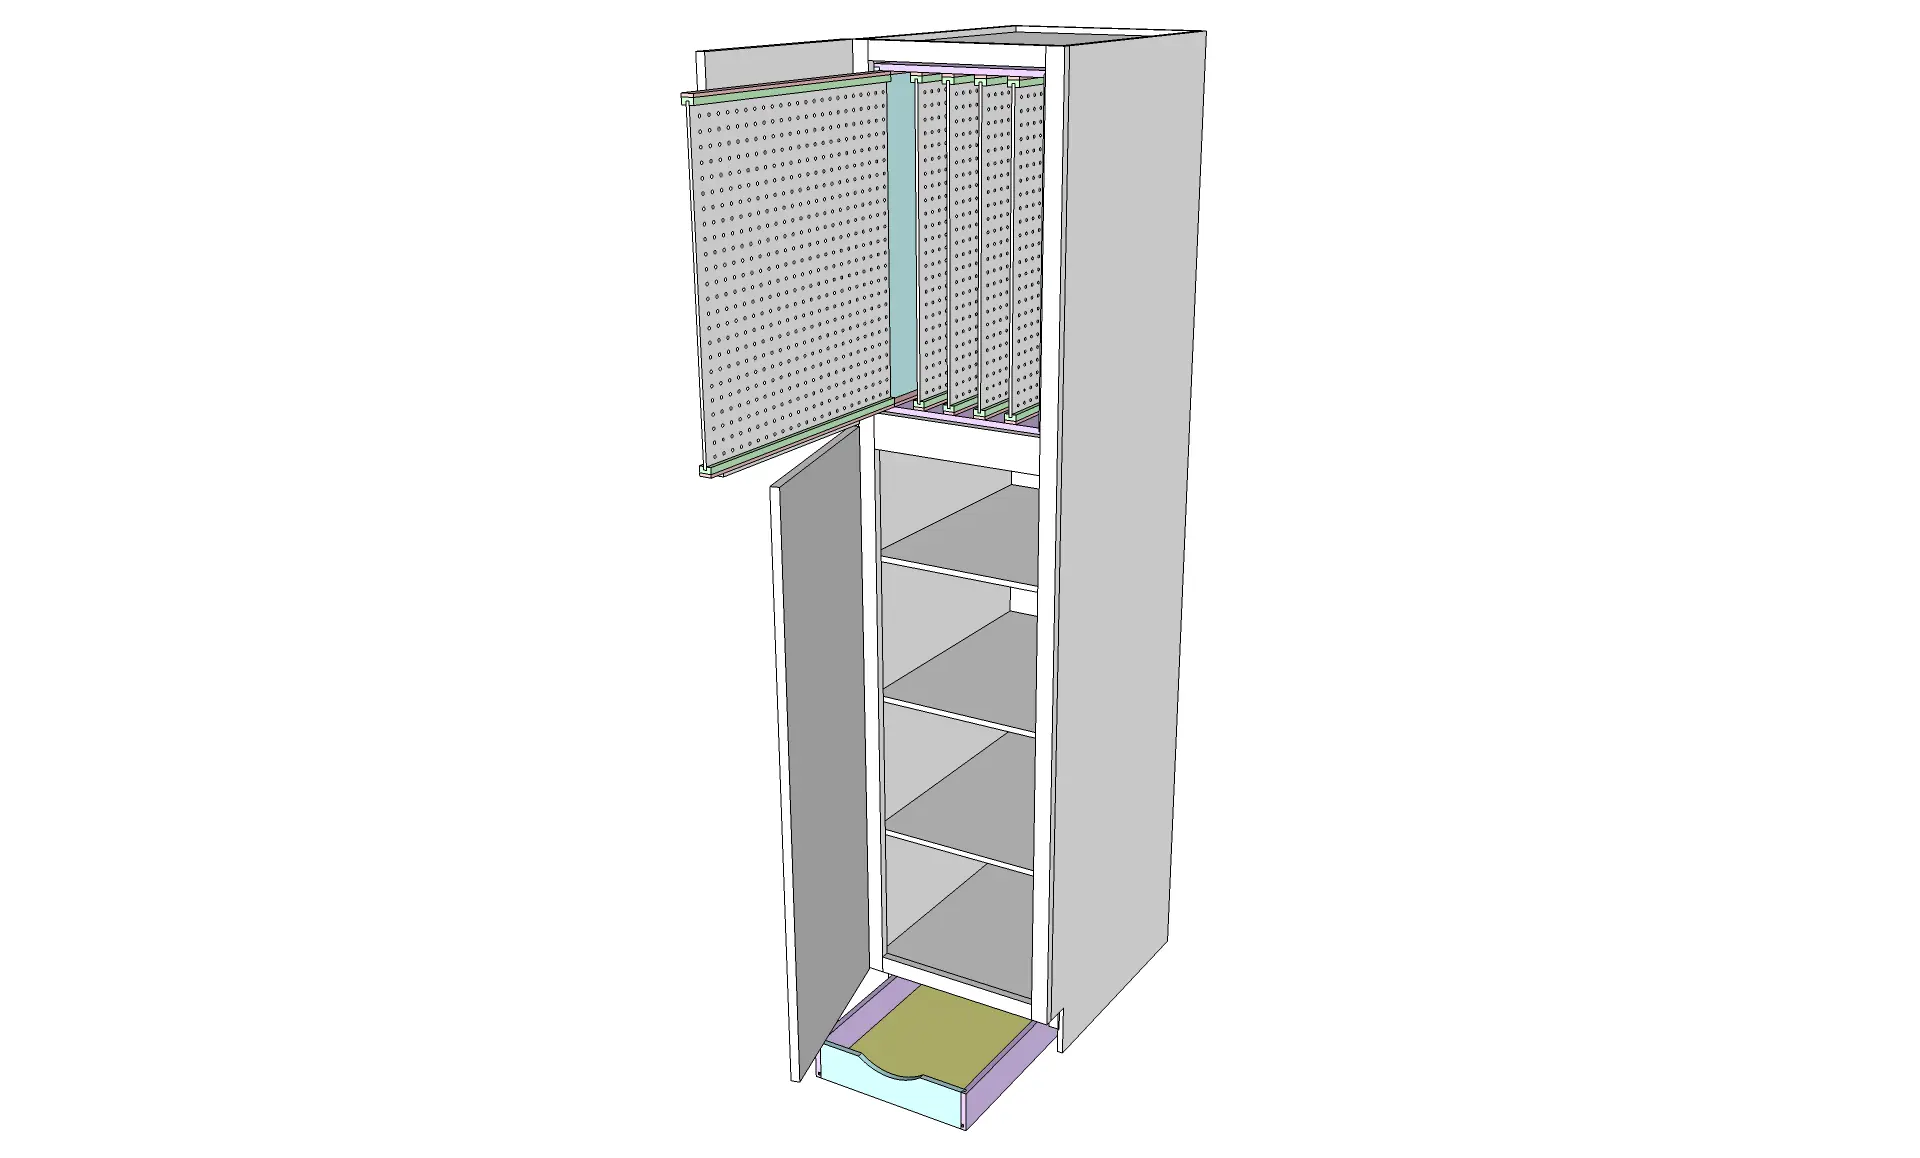
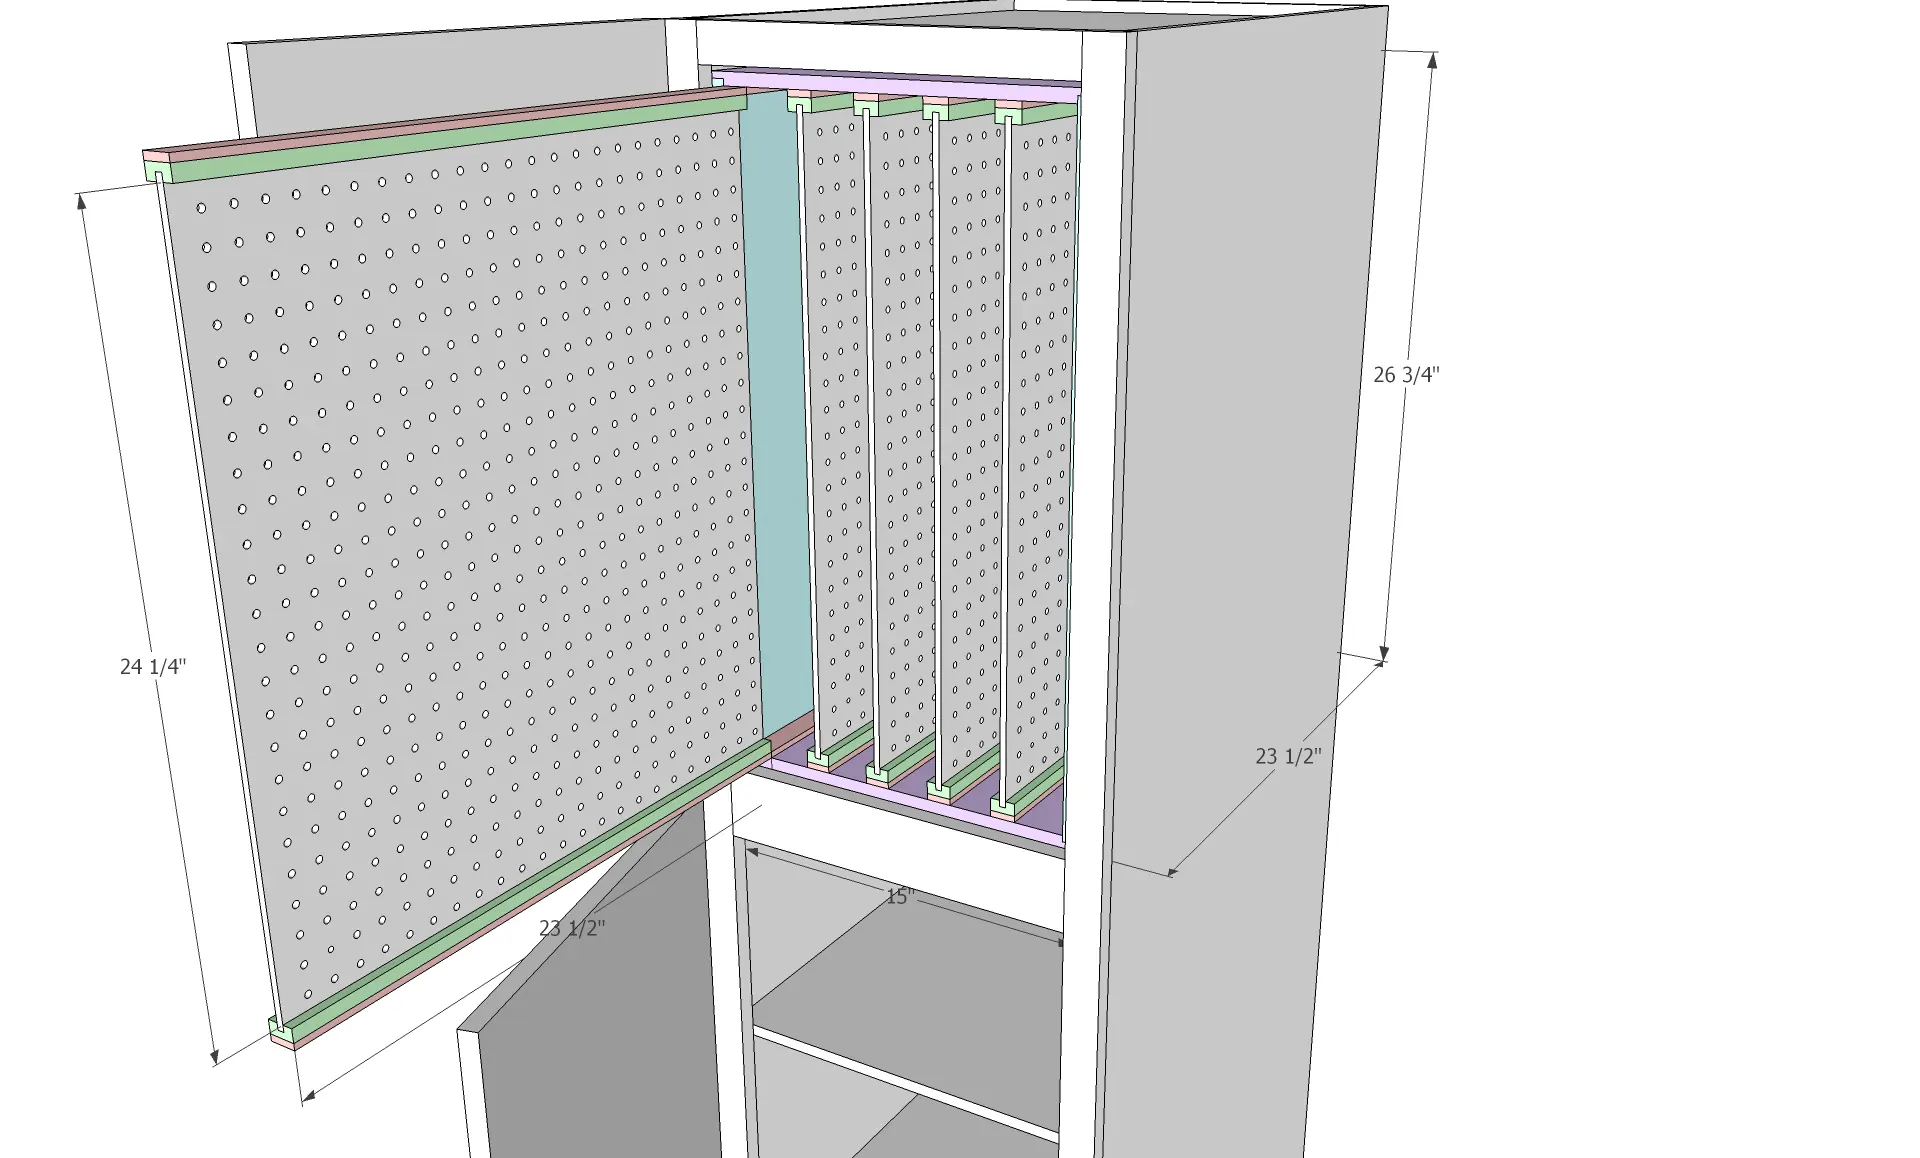
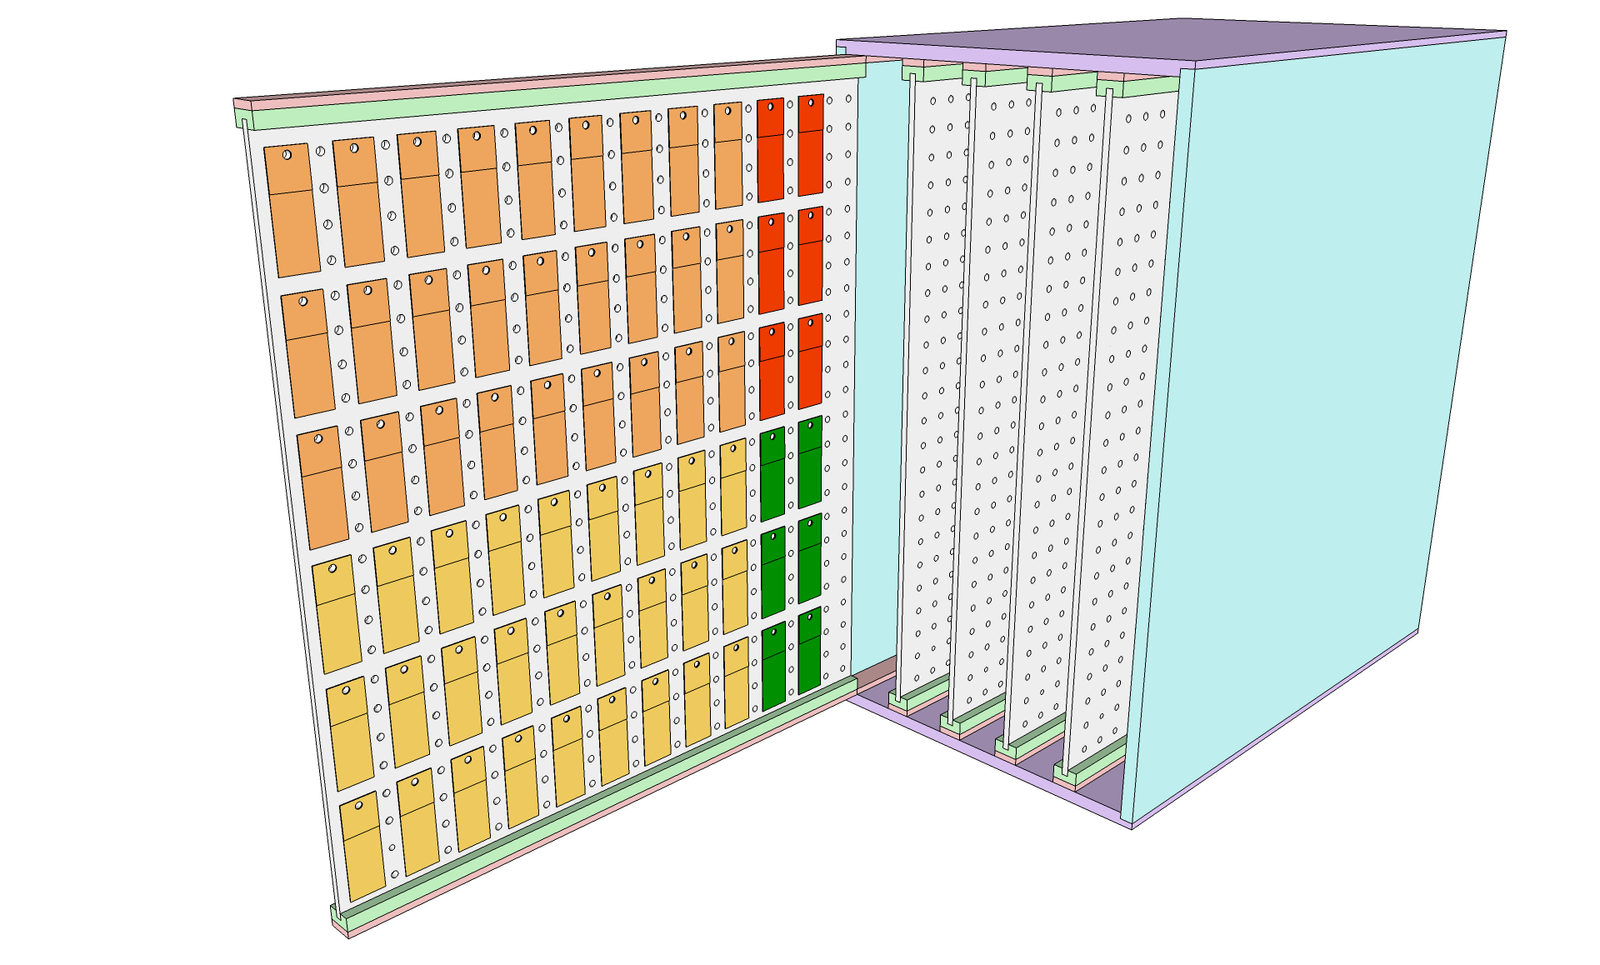
With all of these detail parts and scratch-building supplies now needing a dedicated storage space, I came up with a slide-out pegboard design. It is intended to be installed in the upper portion of one or both Style B cabinets. The initial design consists of five vertical pegboards mounted to 22-inch horizontally installed soft-close drawer slides. This allows each board to slide smoothly in and out, making all of the hanging parts bags easily accessible for future projects.
Each pegboard measures approximately 24 by 23 inches. Details West and Details Associates parts bags are roughly 3-1/2 inches tall and 2-1/4 inches wide. Using a little math again, each pegboard should comfortably store about 66 individual bags, for a total capacity of 330 bags across all five boards. Each board is spaced 2-3/4 inches apart, so in theory, the pegboard hooks could be 2 inches long, allowing multiple bags to be stacked on a single hook. Again, I think I might have an addiction…
Cut-Sheets and Cut-Lists
Cut sheets in the woodworking community are a visual guide that shows how a sheet of plywood gets broken down. A cut list, by contrast, is an itemized list of part sizes and quantities that are produced from cut sheets. Parts may be milled from rough-sawn lumber or cut from full sheets of plywood, depending on the materials used. A well-prepared cut sheet is paired with a cut lists, and vice versa. Together, they serve as essential planning and reference tools that help ensure accuracy, efficiency, and minimal material waste.
For this model railroad benchwork project, I’m focusing primarily on the cut sheets and the process of breaking full sheets of plywood into manageable components. Since no rough saw lumber milling is required, the cut sheet deals entirely with plywood dimensions and quantities. Based on my design data, this custom benchwork and storage project will require 20 sheets of plywood, cut into 32 different part types, for a total of 369 individual pieces.
Depending on a project’s size and complexity, one or multiple cut sheets may be needed to stay organized. Larger projects often benefit from multiple cut sheets, as they keep related parts grouped together and easier to track. This process also provides a clear picture of a project’s complexity and the time required to cut, prepare, and assemble all the pieces.
This project will require the following cut sheets:
Cut-Sheet #1: Base Cabinet Assemblies (Style A)
To build the Style A base cabinets, I will need five 1/2″ × 4′ × 8′ sheets of plywood to construct all five cabinet carcasses. This cut sheet breaks down the plywood into four different parts, producing a total of 30 individual pieces.
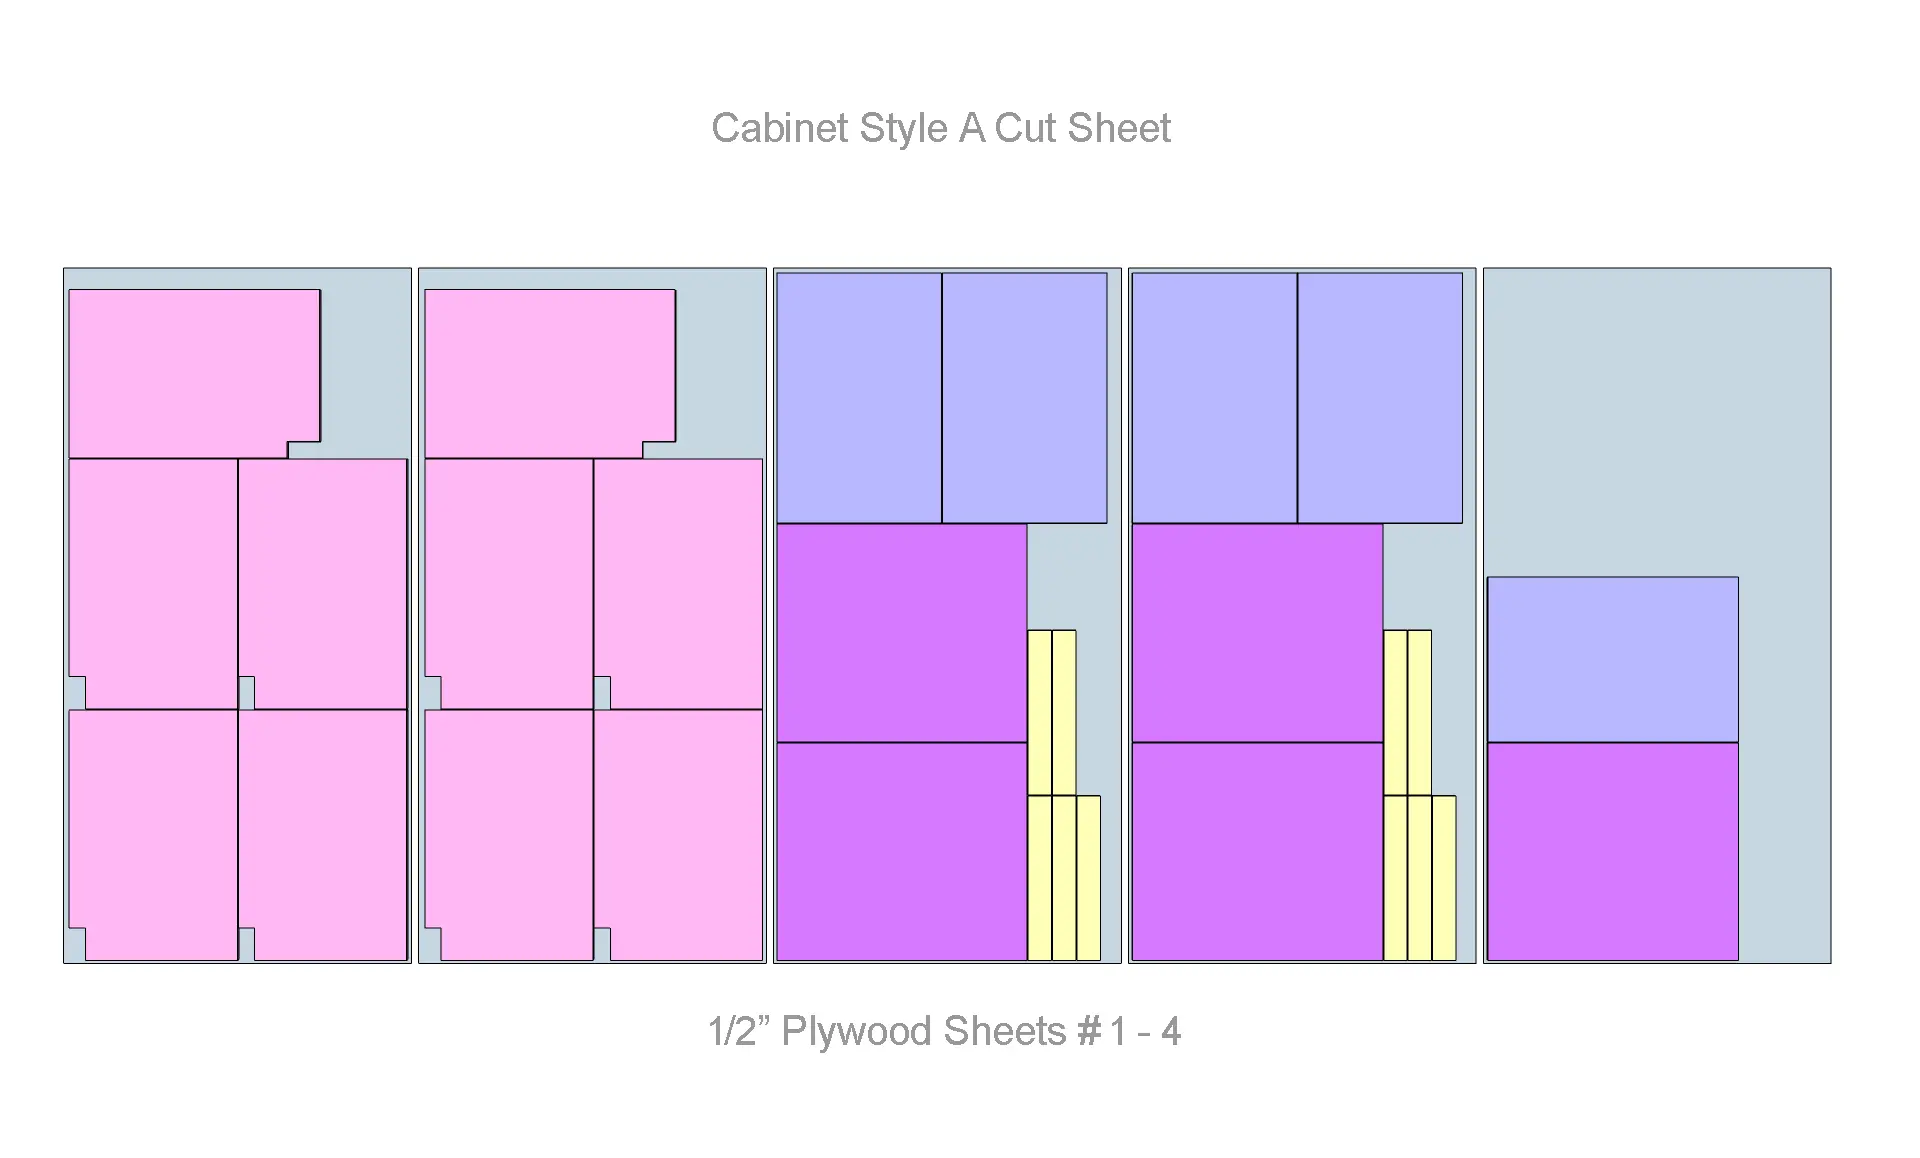
Cut-Sheet #2: End Cabinet Assemblies (Style B)
Style B end cabinets will need four 1/2″ × 4′ × 8′ sheets of plywood to construct two cabinet carcasses. This cut sheet breaks down the plywood into three different parts, producing a total of 16 individual pieces.

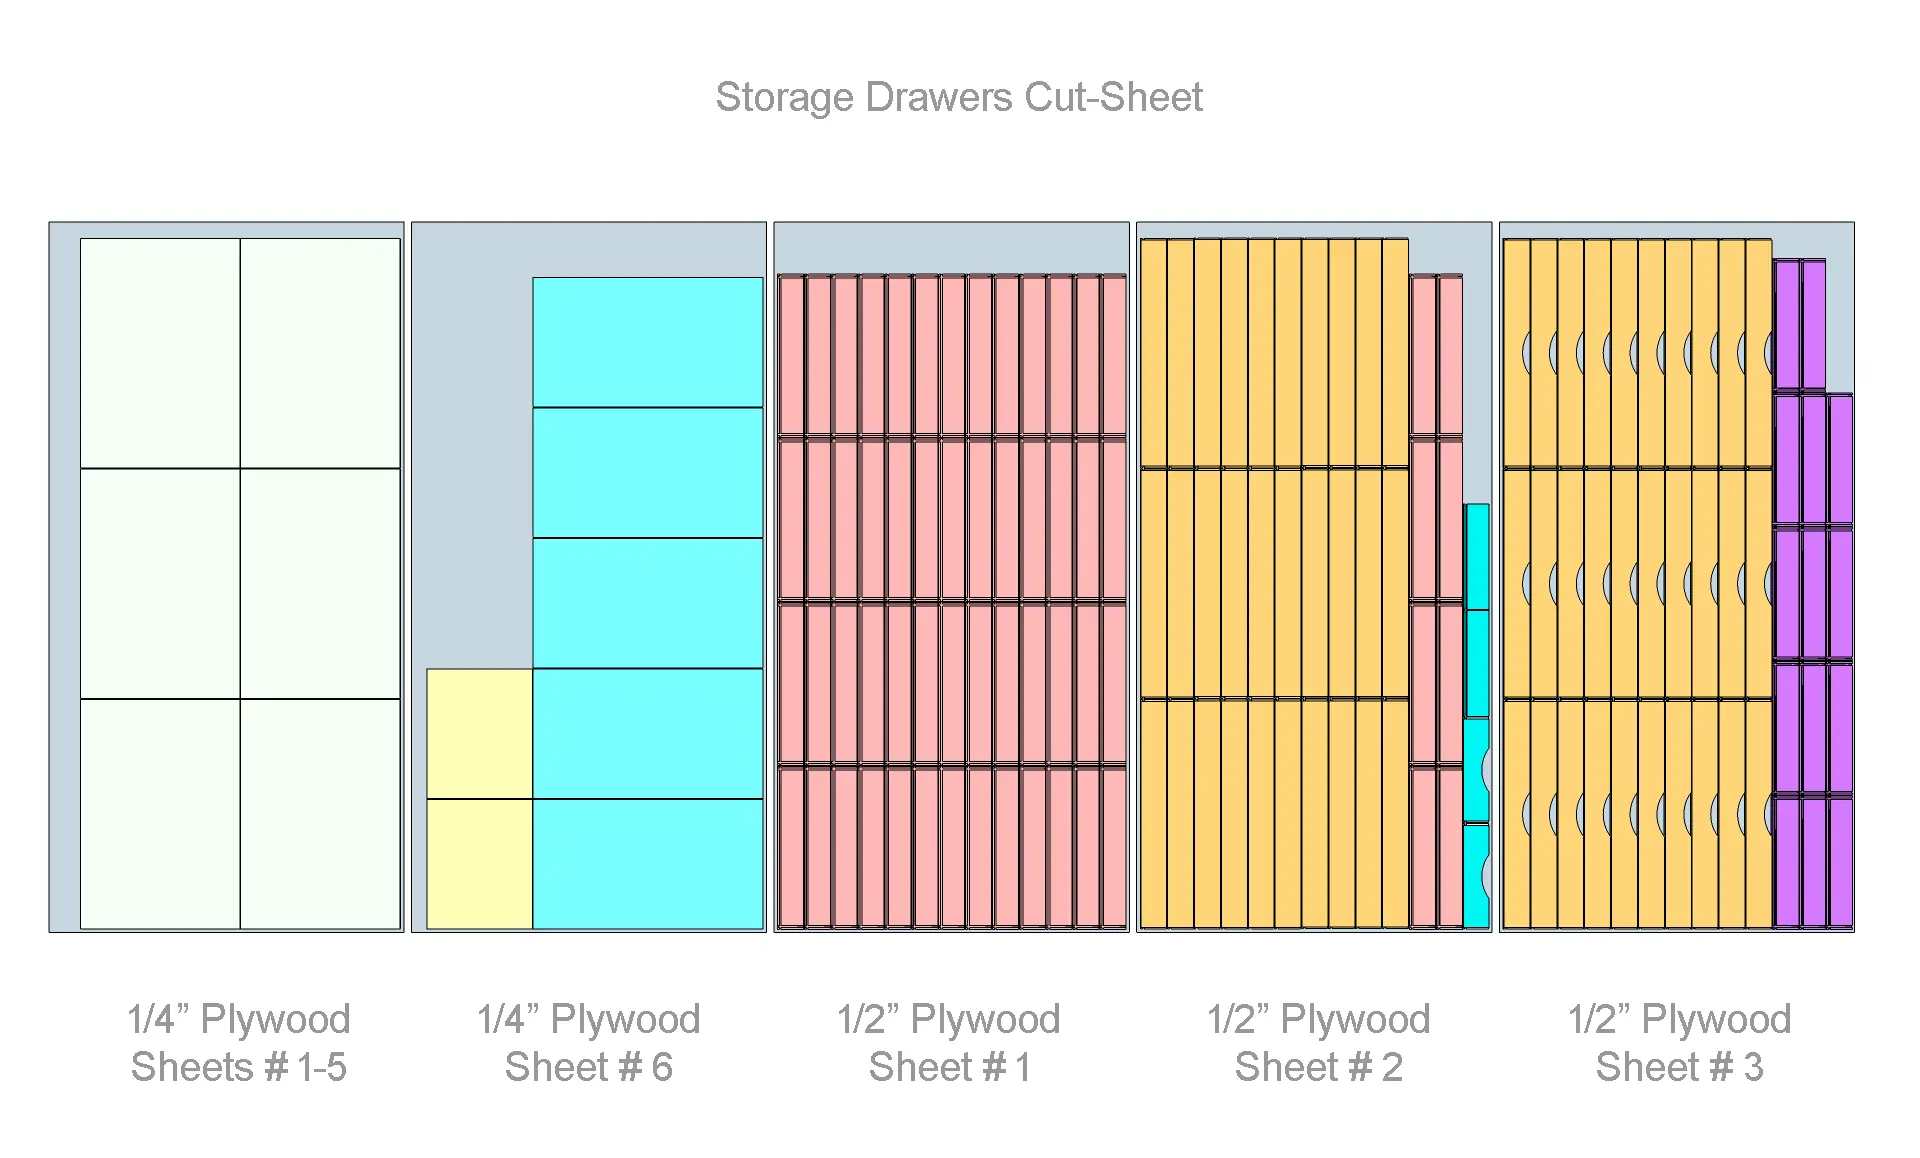
Cut-Sheet #3: Drawer Assemblies
In building the storage drawers for both Style A and Style B cabinets, six 1/4″ × 4′ × 8′ sheets of plywood are used for drawer bottoms, and three 1/2″ × 4′ × 8′ sheets for the drawer fronts, backs, and sides. This cut sheet breaks down the plywood into seven different parts, producing a total of 177 individual pieces.
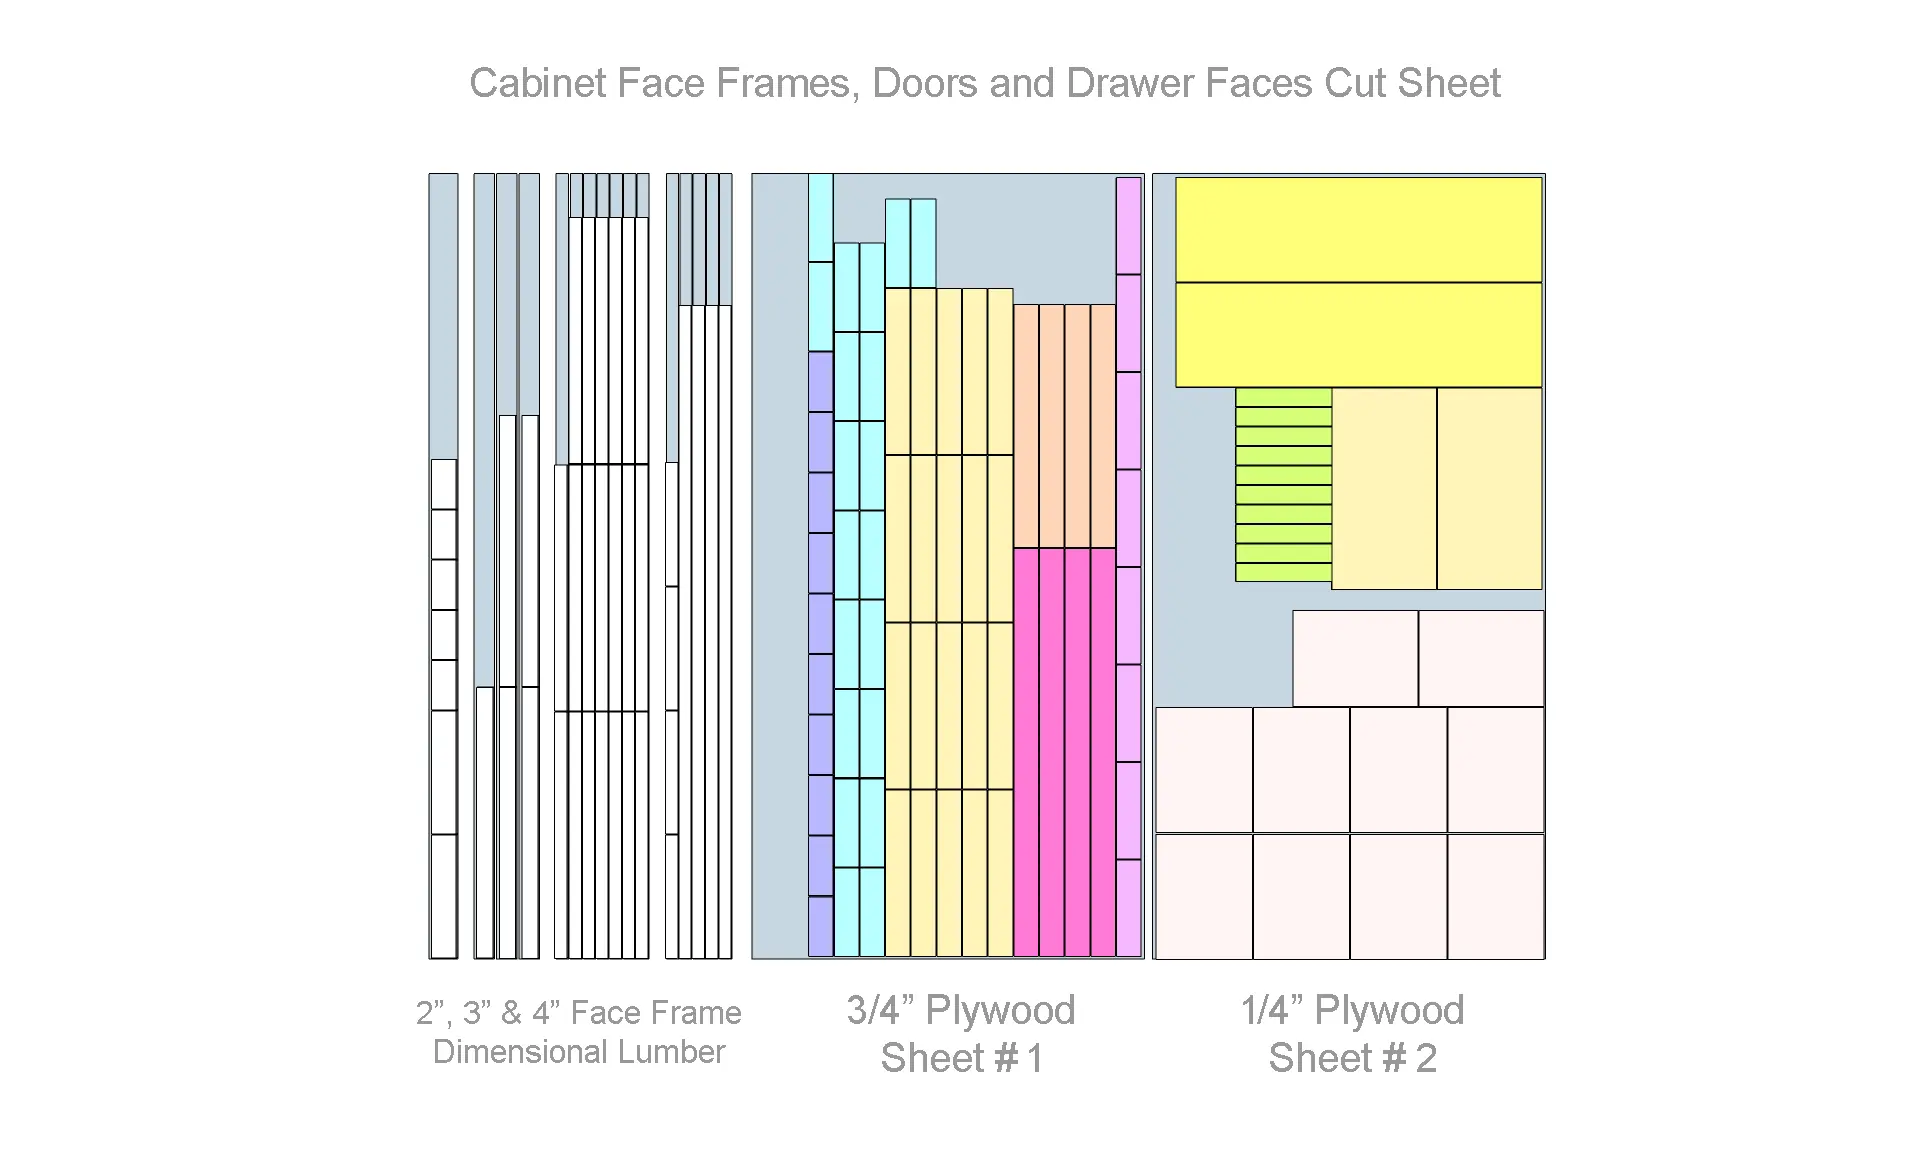
Cut-Sheet #4: Face Frames, Drawer Faces and Doors
The drawers faces and doors for both style of cabinets will require one 1/4″ × 4′ × 8′ sheet of plywood. For the drawer and door panels, one 3/4″ × 4′ × 8′ sheet is necessary.
To build the face frames for both cabinet styles, I will need three sizes of the following dimensional lumber:
- 12 – 3/4″ x 2″ x 8′
- 3 – 3/4″ x 3″ x 8′
- 1 – 3/4″ x 4″ x 8′
This cut sheet breaks down the plywood into ten different parts, and six-teen dimensional boards into 146 individual pieces.
Cut-List #1: Project Master List
| Cut Sheet | Part ID | Meterial | Quantity | Width | Lenght | Notes |
|---|---|---|---|---|---|---|
| #1: Base Cabinet Assembly (Style A) | 1/2" Plywood | 10 | 28 1/8" | 34 1/2" | Side | |
| 5 | 22 5/8" | 34 1/2" | Base | |||
| 5 | 30" | 34 1/2" | Back | |||
| 10 | 3 1/4" | 22 3/4" | Support Rail | |||
| #2: End Cabinet Assembly (Style B) | 1/2" Plywood | 4 | 23 1/4" | 84" | Side | |
| 2 | 17" | 79 1/2" | Back | |||
| 10 | 17" | 22 3/4" | Base, Self, Top | |||
| #3: Drawer Assemblies | 1/4" Plywood | 2 | 14 1/4" | 17 1/2" | Base, Style B, Under cabinet | |
| 5 | 17 1/2" | 31" | Base, Style A, Under cabinet | |||
| 30 | 21 1/2" | 31" | Base, Style A, Mid-Section | |||
| 1/2" Plywood | 60 | 3 1/2" | 22" | Side, Style A | ||
| 60 | 3 1/2" | 31 | Front, Back Style A | |||
| 4 | 3 1/2" | 14 1/4" | Front, Back, Style B | |||
| 14 | 3 1/2" | 18 | Side, Under Cabinet | |||
| #4: Face Frames | Dimensional Lumber | 4 | 1 1/2" | 79 1/2" | Style B | |
| 4 | 1 1/2" | 15 | Style B | |||
| 20 | 1 1/2" | 30" | ||||
| 5 | 2" | 33" | ||||
| 5 | 3" | 6" | ||||
| 2 | 3" | 15" | Face frame, Style B | |||
| #4: Drawer Faces | 1/4" Plywood | 10 | 2 1/4" | 11 3/4 | Panel | |
| 1/2" Plywood | 10 | 3" | 7 1/4" | Stile | ||
| 20 | 3" | 10 3/4" | Rail | |||
| #4: Doors | 1/4" Plywood | 10 | 11 3/4" | 15 1/4" | Panel, Style A | |
| 1/2" Plywood | 18 | 3" | 20 1/4" | Stile, Style A | ||
| 20 | 3" | 10 3/4" | Rail, Style A | |||
| 1/4" Plywood | 2 | Panel, Style B, Lower | ||||
| 1/2" Plywood | 4 | 3" | 49 5/8" | Stile, Style B, Lower | ||
| 8 | 3" | 11 3/4" | Rail, Style B, Lower & Upper | |||
| 1/4" Plywood | 2 | 12 3/4" | 24 5/8" | Panel, Style B, Upper | ||
| 1/2" Plywood | 4 | 3" | 29 5/8" | Stile, Upper, Style B |
Materials List for this Model Railroad Benchwork Project
Once my design is finalized, I’ll put together a materials list containing most of the items required to assembly the project. My material list normally do not include general shop supplies that I usually keep on hand. This mostly includes consumables like glue, sand paper, screws, paint brushes, rollers, painters tape and other related items. If I require something not normally keep on hand like specialty screws, nuts and bolts, stains and finishing products, I’ll add them to the materials list.
A materials list is a simple yet essential document. It outlines all the raw materials and items needed to complete a project, including lumber, hardware, fasteners, adhesives, and finishes. Having a materials list ensures that I have everything on hand before work begins. Reducing interruptions and unnecessary trips back and forth to the store is important. By organizing costs, quantities, and types of materials in advance, I save time and money while keeping the project organized and on track from start to finish.
| Supplyer | Item Number | Description | Quanity | Price Ea. | Total | Notes |
|---|---|---|---|---|---|---|
| Amazon | Wood Veneer Edge Banding 5/8" x 250' | 1 | 40. | 40. | ||
| Foam Rubber Toolbox Drawer Liner 24: x 24' Roll | 1 | 42. | 42. | |||
| Ball Bearing, Soft Close Drawer Slides, 22 Inch, Black, Pkg of 10 | 5 | 123. | 615. | Mid-Level Drawers | ||
| Ball Bearing, Soft Close Drawer Slides, 18 Inch, Black, Pkg of 10 | 1 | 106. | 106. | Under Cabinet Drawers | ||
| Heavy Duty Adjustable Leveling Feet, Pack of 16 | 2 | 39. | 78. | |||
| Home Dept | SKU #479023 | Sande Plywood ( 1/4 in. x 4 ft. x 8 ft.) | 6 | 30. | 180. | |
| SKU #454532 | Sande Plywood ( 1/2 in. x 4 ft. x 8 ft.) | 12 | 46. | 552. | ||
| SKU #454559 | Sande Plywood ( 3/4 in. x 4 ft. x 8 ft.) | 1 | 66. | 66. | ||
| 1 1/2 in. W x 96 in. L Primed Wood Finger Jointed S4S Moulding | 12 | 10. | 120. | for face frame | ||
| SKU #1012121478 | 2 1/2 in. W x 96 in. L Primed Wood Finger Jointed S4S Moulding | 3 | 11. | 33. | for face frame | |
| SKU #1001775106 | 3 1/2 in. W x 96 in. L Primed Wood Finger Jointed S4S Moulding | 1 | 15. | 15. | for face frame | |
| 5/16 in.-18 x 2 in. A307 Grade A Zinc Plated Steel Hex Bolts (50-Pack) | 1 | 23. | 23. | |||
| 5/16 in.-18 A307 Grade A Zinc Plated Lock Nuts (50-Pack) | 1 | 17. | 17. | |||
| SKU #1000241959 | 5/16 in. x 1-1/4" Grade A Zinc Plated Lock Nuts (100-Pack) | 1 | 22. | 22 | ||
| Total: | $ 1,909. |
Final Thoughts
Designing model railroad benchwork is about far more than just supporting track. It’s about understanding your space, defining your priorities, and making intentional decisions that balance your enjoyment with realities. By starting with the benchwork, I was able to work within fixed room constraints, maximize storage, and create a foundation. Incorporating modular construction, thoughtful storage solutions, and future removal considerations allowed me to build with confidence knowing the layout can be removed with minimal disruption to my living space.
Just as important, this process reinforced the value of planning. Using CAD software, generating detailed lists and thinking through every drawer, cabinet, and storage design before cutting wood helped to eliminate guesswork and costly mistakes. The result is benchwork that not only functions well but also stays organized, efficient, and visually cohesive with in the living space. In the end, this approach lets me focus on what matters most, building, operating, and enjoying the the fruits of my labor.
I hope you found this article informative and useful in helping you achieve your model railroad benchwork goals. If you’re new to My Layout Progress Journal, I encourage you to check back regularly for more articles like this one. See you next time…